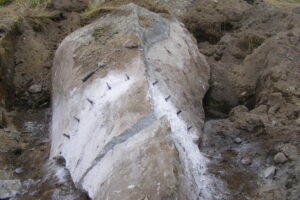
The Granite Calliope started out as a rock protruding out of the ground in my field. I had mowed around it for 30 years. After several hours of backhoe work I unearthed a 5′ high by 6′ wide by 13′ long granite boulder!

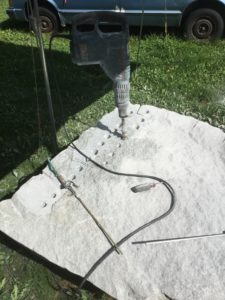
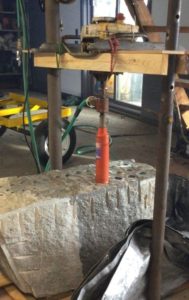
To remove the rock I had to drill holes and use wedges to break the rock into smaller pieces. After drilling the holes, I would use a blow gun and compressed air to plow the dust and chips from the hole before inserting the wedges.
If I blew air across the holes, I could make them whistle (like blowing on a bottle). The holes would make a different sound depending on how deep they were drilled. The idea for a Granite Calliope was born.
It was about a year before I started the project and there were a lot of unanswered questions. How would I tune the holes? What would I use for air valves? Could I build the electronics to connect it to a computer? I had to start the project to find the answers.
I picked out a block of granite from my stash that was about 2 feet square and 18 inches thick. Next, I drilled a ¾” diameter hole about 10 inches deep and blew air across it and it played a tone. Then I drilled a hole about 14 inches deep and blew air across it. I was expecting a lower note because the hole was longer, but it played a higher note. I was confused. I drilled some shorter holes less than 10 inches and they played higher tones. I enlarged the 14 inch hole to 1” diameter and it played a lower tone. The tone is based on the diameter and the length, not just the length.
Now that I had some holes, how could I tune them? By accident I was browsing through the app store on my Ipod and found a guitar tuning app. I downloaded it, took it out to the rock, blew a hole and to my amazement my Ipod told me what note it was playing and how sharp or flat it was. My first problem was solved!
I wanted to move to the other problems before spending a lot of time drilling holes I might not be able to use. I checked my industrial supply catalogs and found that air valves were about $125.00. I was planning on about 30 notes. That was $3750.00, a little out of my budget. I have a catalog for Surplus Center where I buy Hydraulic parts to keep my backhoe running. I got it out and they had a section on pneumatic parts. I found a valve that looked promising so I ordered it. When I received it I knew it wouldn’t work. It was way too small. It was hard to tell from the picture in the catalog. Luckily, they take returns. On my next order I got 6 different valves. 3 were too small but 3 would supply enough air. One was 120v ac, one was 24v ac and one was 28v dc. I wanted the calliope to be used without plugging it in. The 28v valve worked on 24 volts so I could use 2 12 volt batteries for power, plus the 28v valve had a better mounting setup than the others. The valve cost $9.95. When I received the valve, it was packaged in an oiled heavy paper package with shredded paper padding. The valve itself was in a copper foil pouch with humidity sensing strips inside. They were obviously military surplus. I ended up ordering 45 valves and they were all manufactured between 1955 and 1958. They were actually hydraulic valves and 28V is used in aircraft. They were probably used in 1950’s military aircraft and cost a lot more than $9.95. Problem 2 solved.
Connecting all those valves to a computer and have them play music was a big project. I have been using a program called “MusicTime”. You can enter notes onto a staff sheet with the mouse and then play it like a player piano. You can enter any sheet music this way. This is how I planned to play the calliope.
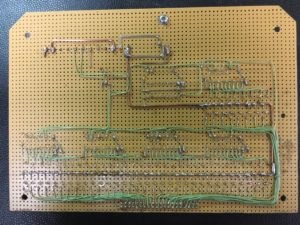
I had heard of MIDI (Musical Instrument Digital Interface) but never used it and did not know much about it. It is the standard way of hooking up keyboards, synthesizers and other musical equipment to a computer. MusicTime can send music to a sound card and speakers or send out MIDI commands to turn notes on and off. MIDI sounded like the best way to control the calliope. Old computers had a MIDI port built in, but new computers do not. I had to order a USB to MIDI adapter cable and do a lot of research to learn how MIDI actually works. After that I had to design and build the electronics to plug into the MIDI cable, receive and decode the signals and operate the proper valve to play the note. This phase of the project took over a month of full time work to complete, but in the end it worked. I could play notes with MusicTime and valves would click on and off. The last problem was behind me and the project was a go.
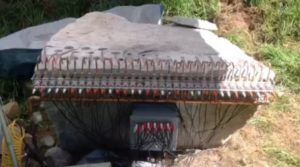
The next six months were spent drilling and tuning the 45 notes, mounting the valves, building a manifold to supply 50 psi air to all the valves, plumbing the valves to blow air across the holes and wiring the valves to the MIDI controller. The highest note (B5) is ½” diameter and 2 ¼” deep. It worked out that each note was about 5/8” deeper than the previous note. I would drill ½” holes until I got to a point where the note would not play lower and would resonate at a higher frequency. I would enlarge the hole and repeat the process. I ended up drilling holes that were ½, ¾, 1, 1 ¼, 1 ½, 2 and 3 inches in diameter and ranging from 2 ¼” to 24 ½” deep. The bigger the hole, the longer it took to drill. The ½” x 2 ¼” hole took about 20 seconds with a Bosch hammer drill and carbide drill bits. The Bosch drilled everything but the 3” holes.
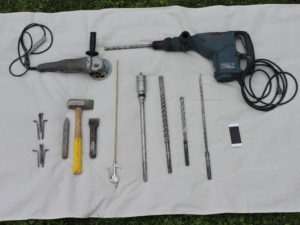
Tools to build a calliope
I drilled 2 3” holes for the lowest notes, The 3” x 24 ½” hole (D#2) took about 3 days with a water cooled diamond coring bit and a gasoline post hole drill. I really wanted some lower notes, but the 24 ½” hole just stared to break out of the back side of the rock. I could not go any deeper. Also, the 3” holes are very hard to blow and there is a slight delay after applying the air before the note sounds.
The valves worked great but there was a minor issue with them. They were military hydraulic valves. The ports were threaded to accept a hydraulic fitting and I wanted to use flair fittings for ¼” copper tubing. These fittings have national standard pipe threads. I found that if I used a 3/8 NPT fitting I could machine the thread off and re-thread it with the hydraulic thread. What the heck, there are only 90 fittings required for the 45 valves. What else do I have to do? I’m retired and have a metal turning lathe. The valves also had military grade connectors on them. The mating connectors, if I could even get them, are very expensive. I drilled the connectors out and replaced them with RCA audio connectors, then I could use cheap audio cables to connect them to the MIDI box (money was more of an issue than time).
I used about 50 feet of ¼” copper tubing to plumb the calliope. I had to do a lot of experimenting (trial and error) to get the tubes to blow the air just right to produce a good note. I flattened the end of the tube to produce a long narrow slit to supply a ribbon of air across the hole. I used shim stock while crushing the tubing to produce a consistent slot. Different size holes required different size slits, so it was a long tedious process to get all the notes to play.
It was finally time to see if I had a big rock with holes in it, or if I had built a calliope. I had ordered sheet music for “The Washington Post” and entered it into MusicTime. I turned on the computer, loaded MusicTime, started the compressor, turned on the power to the MIDI box, held my breath and pressed play. All of a sudden the neighborhood was full of the sound of Susa’s march. It was a CALLIOPE and it was LOUD.
The notes sounded good but some were louder than others. I really needed a way to adjust the air flow on each hole. I went back to the lathe and machined 45 small needle valves from 3/8” diameter brass rod. I cut the tubing going to the note and soldered in the valve. Now I was able to turn down the volume of the loud notes.
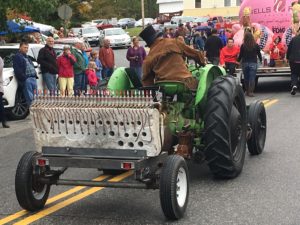
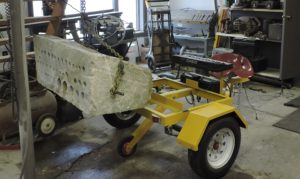
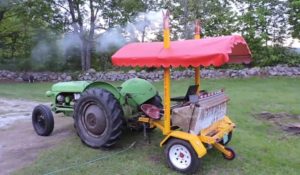
September was half over and our town has a Fall Foliage Celebration on the first Saturday of October with a big lumberjack breakfast, street vendors, a parade and a chicken pie supper. I wanted to debut the calliope in the parade, but it was still a huge chunk of granite. I used less than half of the rock for the notes. I had to cut the unused part off. Could I split it off without breaking the calliope part? I drilled the series of splitting holes a little closer than usual, put in the wedges and started tapping them. All of a sudden the rock split and broke apart. The calliope was safe and a more manageable size, only 1200 pounds. Now I needed a trailer to mount the granite on. I had an old axle and wheels from a small car. A trip to the steel yard and a few days of cutting and welding and I had a trailer. Up to now all the work had been done on the top of the rock. It is a lot easier to drill straight down. When I mounted the calliope on the trailer, I flipped it so the holes were on the back side. Now the sound would be projected out of the back, not up to the sky. I was going to tow the trailer with my old Ford 8N tractor and I needed a compressor for the air. I took my shop compressor apart and mounted the compressor head to the back of the tractor and attached it to the power takeoff with V belts. I got everything hooked up and running about 3 hours before the parade started. It wasn’t pretty, just a bare steel frame and a chunk of granite and copper tubing, but it would have to do. It’s about 3 miles to town and a tractor is not the fastest way to get there so I headed right out. I made it in time and towed the calliope through town playing “the happiest music on earth”. Some people knew what was happening and would give me a big thumbs up. Other people thought I was just playing music and pulling a rock through town. They had no idea of what was happening. When the parade ended it started raining and the Calliope was not waterproof yet. I couldn’t hang around and explain what I was doing, so I had to head for home.
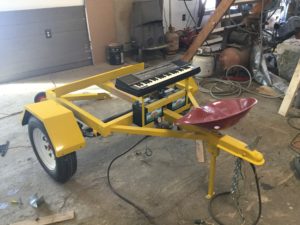
It had worked. Winter was coming so I moved the calliope into the garage. I took the calliope off the trailer and started cleaning the frame and making fenders. I was looking through another catalog and found a metal tractor seat. I thought it would be nice to have a keyboard on the calliope so someone could play it. The tractor seat would be nice for someone playing the keyboard. I ordered the seat. Now I needed a keyboard. By using MIDI to control the calliope, that meant all I had to do to use a keyboard was to unplug the computer and plug in a MIDI keyboard! I found an old Casio keyboard on Ebay for $20 so I ordered it. When I connected it to the calliope, it worked! I mounted the seat to the trailer, made some brackets to hold the keyboard and painted everything. I also made a music stand to hold sheet music. I could fold it down and set my computer on it and use the tractor seat if I was not towing the calliope in a parade.
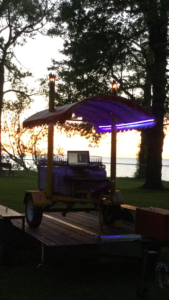
I wanted some kind of cover to keep the rain off me and the calliope when we were performing. I could not figure out how to mount a canopy on the trailer. One day I was watching videos of steam boat calliopes on U Tube. I saw the big smoke stacks with the flared tops. I got 2 pieces of 3” diameter steel tubing and mounted them on the sides of the trailer and made some flared tops out of polished sheet copper. Now I had something to attach the canopy to. I used ¾” steel tubing for the canopy frame and covered it with red vinyl. My wife did the sewing on the vinyl top.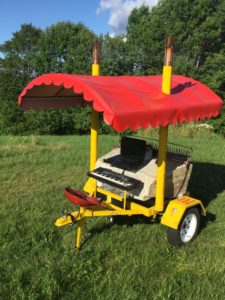
The smoke stacks on the sides of the trailer looked good, but they didn’t do anything. Smoke would be nice. I set out to build a couple of smoke generators. It turned out to be more difficult than anticipated. After several failed attempts, I succeeded by making a 12 volt heater coil and using wood pellets to make the smoke. It was more impressive towing it in a parade with smoke flowing out of the stacks.
I knew I would be playing the calliope at night. You can’t see the smoke at night. I got a couple of tiki torches, modified them to fit into the stacks and I was good to go. I could put either the smoke or fire into the stacks. What about lights? I would need them at night. I got a string of RGB (red green blue) leds with a remote control from Home Depot and mounted them on the bottom of the canopy frame. With the remote control I can choose any color or have them change colors sequentially.
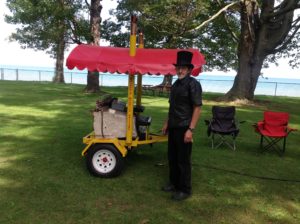
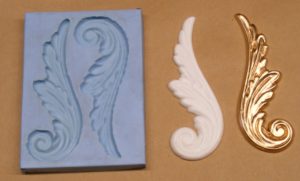
Things were really coming together, but the trailer needed some sprucing up. It was just solid yellow. I found pictures of calliope circus wagons. They were elaborately decorated with wood carvings and lots of gold. I found some onlays in a woodworking catalog (fancy wood carvings you can glue onto woodworking projects without actually having to do the carving). I ordered some, painted them gold and attached them to the trailer frame and fenders. I had the trailer pinstriped and put “Gordon’s Granite Calliope” on the side of the stacks in vinyl lettering.
I could tow the calliope in a parade, but not long distances on the road behind the truck. I needed a way to haul it around. I have an old trailer that I hauled the tractor on when we first bought the property. I have just used it for a hay wagon for the last 20 years and it wasn’t road worthy any more. I had to clean the rust, repaint the frame put on new axles and a new bed. The completed calliope weighs about 1500 pounds and I can’t load and unload it on the trailer by hand. I added 2 winches to the trailer. Now I can load and unload it with the push of a button.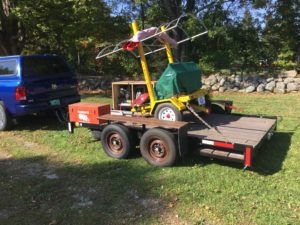
The first showing of the completed calliope was at “Rockfire”, an amazing 2 day event sponsored by the Vermont Granite Museum in Barre VT. Rockfire is ranked as one of the top 10 annual events in Vermont. People come from all over New England and beyond. We had attended Rockfire the year before, and when I finished the calliope, I contacted them to see if they would be interested in having the Granite Calliope at the event. They sent a representative to check it out and I was immediately invited to the event. It was a big hit, especially because it is made of granite. I have participated in 3 events for the Granite Museum.
The next event was the Woodsville NH Fourth of July Parade. I was in the staging area waiting for the Parade to start. People were coming over to check out the calliope. One guy came over and said “Now that’s what I call Real Rock Music”. When I got home I ordered more lettering. It now says “Real Rock Music” on the top of the fenders. Other people have called it “The Rolling Stone”.
One day I was digging through my bookcase and found the brochure for “The Carousel Organ Association of America”. I did not know if my calliope would fit in with antique mechanical instruments, but I joined anyway. I started receiving “Carousel Organ”, the COAA magazine. I really wanted to attend a rally, but there was nothing going on near Vermont. Then I saw a rally in Olcott Beach in New York. That might be doable. After all New York borders Vermont. I looked at a map and found Olcott Beach. It is north of Buffalo, and Buffalo Is 500 miles from Vermont! Oh well, I am retired. We loaded everything up and drove to Olcott, no knowing what kind of response I would get with a homemade, computer driven, granite calliope. Well, it was the most fun my wife and I have had in years. Everyone was amazed at the music it was producing and the overall appearance of it. We were immediately accepted into the group.
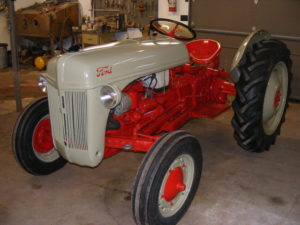
Two years have passed since I completed construction of the calliope. We spent last winter in the southwest. We stayed home this winter and I needed a winter project to pass the time. I bought my 1951 Ford 8N tractor about 35 years ago and it needed a lot of work. It had been painted school bus yellow with spray paint cans and was peeling off. The engine was tired and burning oil and the tires were worn out. I stripped and repainted the tractor, had the engine rebuilt and got new tires. I had some other equipment that was painted green so I painted the tractor green. Over the years I have gotten a lot of grief for having a green Ford tractor. After 35 years, my paint job was giving out and the tires were cracking with age (like me). I wanted to spruce it up for the parades. The engine is still strong so I just needed paint and tires. I stripped everything down to bare metal, fixed some dents and rust in the sheet metal, got new tires and repainted it with official Ford 8N colors, grey and red. It took about 3 months but now I have a new antique tractor to tow the calliope with.
Winter wasn’t over yet and there were some items on the calliope I wanted to attend to. The first item was the 3” low notes. They did not play well. There was a lot of hissing from the air blowing across them and they were not as loud as I would like. I have tried on several occasions to improve the sound but nothing worked. The only thing that seemed to help was increasing the air pressure. The problem with doing that was my compressor is maxed out now. I can’t get any more pressure. I read an article in Carousel Organ magazine on how organ pipes work. I still don’t know exactly how the holes in the granite produce sound, but I added a piece of copper across the big holes to make them more like an organ pipe. For the first time I was able to make the notes louder and decrease the air noise.
The next item was the wood onlays I used to decorate the trailer. I painted them with 5 coats of paint to try to keep the moisture out. It seems like every time I take the calliope out, it rains. The moisture had gotten into the onlays and they have swelled up and are cracking. Also the gold paint does not hold up outside and has turned brown. I like to solve problems and try new things I haven’t done yet. I bought some new onlays, some rubber mould making compound and some casting resin. I made some moulds with the new onlays and cast some new ones with the resin. I now have plastic onlays that will hold up to the rain (a new skill learned that can be used to solve other problems in the future). My solution for the gold paint problem was a little pricey, but it was also something I’ve wanted to do for a long time. Apply gold leaf. My onlays are now 23.5 kt gold, the same stuff they use on capitol building domes. Bring in the rain!
The last item this year was to make the calliope more interesting to watch while it is playing. The air pipe for one of the notes is long and it vibrates when it is playing. People like to watch it when it plays. When I first build the calliope, I tried gluing strips of ribbon to the end of the pipes so they would wiggle when the notes played. It did not work. The ribbon would wiggle, but it would interrupt the air flow across the hole and the note would sound horrible. I had to take them off. After thinking about it for several years I had another idea. I drilled a small hole (#75 drill – smaller than a pin) near the end of the air pipe and glued the ribbon on so the air coming out of this hole would blow on the ribbon. This worked. Now when the calliope plays, the ribbons show which note is playing.
I don’t think the calliope will ever be finished.